When you purchase through links on our site, we may earn a commission at no extra cost to you. Learn more.
Your cat’s ears look dirty. Maybe it’s just wax. Or maybe it’s something living in there.
Table of Contents
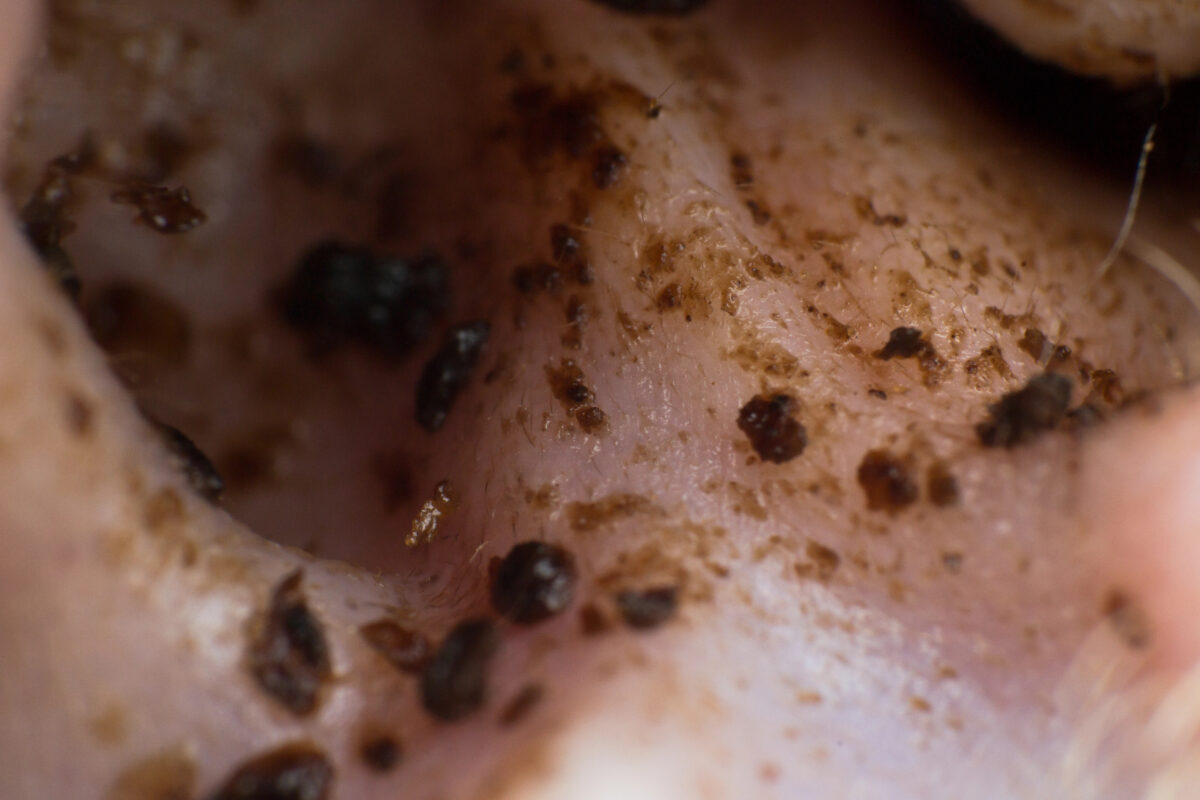
That dark, crumbly buildup that looks like coffee grounds is one of the most common signs of ear mites. But here’s the part most people don’t realize: Ear mites, infections, allergies, and normal wax can all look almost identical at first.
So, people clean the ear, wait a few days, and hope it improves. Sometimes it does. Sometimes it gets worse.
The difference comes down to what you’re actually seeing and how your cat is reacting. This guide will walk you through the difference between dirty ears and ear mites so you know when it’s safe to clean and when it’s time to call your vet.

Ear Wax vs Ear Mites: Key Differences At A Glance
| Sign | Normal Dirty Ears | Possible Ear Mites |
|---|---|---|
| Wax Color | Light brown | Dark brown or black |
| Texture | Smooth, waxy | Dry, crumbly (coffee-ground-like) |
| Smell | Little to none | May smell foul |
| Behavior | Minimal scratching | Frequent scratching, head shaking |
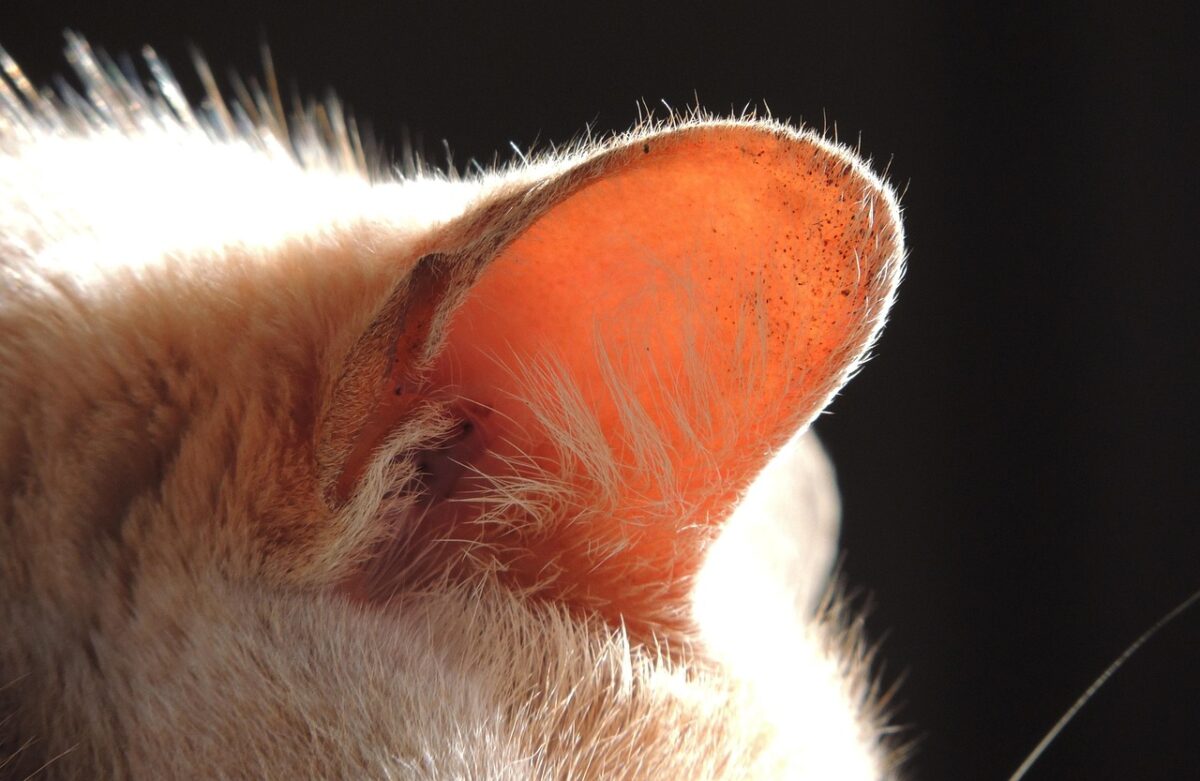
What Healthy Cat Ears Should Actually Look Like
Cats don’t need perfectly spotless ears to be healthy. In fact, a small amount of wax is completely normal. Ear wax acts as a protective barrier, trapping dust, bacteria, and debris before they can reach deeper parts of the ear.
Healthy ears should look:
- Clean or lightly waxy
- Free of swelling or irritation
- Consistent in appearance (not suddenly changing)
There should be no strong odor, and your cat shouldn’t react when you touch or examine the ear.
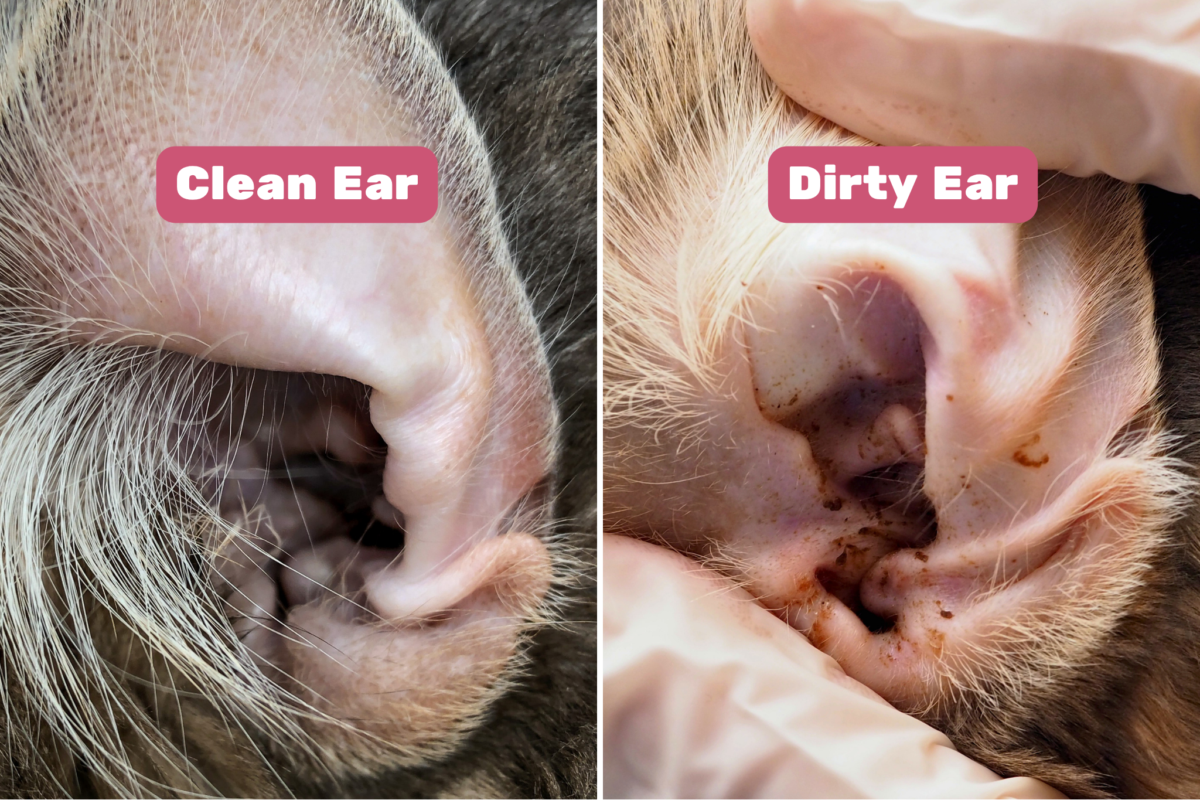
Ear color can vary depending on your cat’s natural pigmentation. Some cats have pale pink inner ears, while others may have darker or gray-toned skin, freckling, or areas that aren’t uniformly pink. This variation is normal and doesn’t indicate a problem on its own.
A cat with healthy ears isn’t obsessively scratching, shaking their head, or avoiding touch. If your cat suddenly becomes sensitive around the ears, that’s often the first sign something isn’t right.
What Causes Dirty Ears In Cats?
Not every dirty ear means something is wrong. Some cats naturally produce more wax than others, especially if they’re exposed to dust or debris in their environment.
Common causes of dirty ears include:
- Normal wax buildup
- Environmental dirt
- Allergies
- Moisture trapped in the ear
- Infections
- Parasites like ear mites
The goal isn’t to eliminate wax completely but to recognize when the wax changes in color, texture, or amount.
The #1 Mistake Cat Owners Make With Ear Problems
At a glance, most ear issues look the same. The body responds to ear irritation the same way, no matter the cause. Whether it’s mites, infection, or allergies, the ear produces more wax and inflammation.
That overlap leads to a common mistake: treating symptoms instead of the cause.
Some owners clean their cat’s ears repeatedly when they actually need medication for an ear infection. Others go out of their way to treat ear mites when the issue is something else, like allergies.
The result is the same. Without proper treatment, the underlying issue keeps getting worse.
Ear Mites vs Ear Infection vs Allergies
This is where even experienced pet owners get tripped up. All three conditions can cause:
- Discharge
- Irritation
- Scratching
- Inflammation
But they behave differently once you know what to look for.
Ear Mites Symptoms
- Intense itching
- Dark, crumbly debris
- Highly contagious
Ear Infections Symptoms
- Thick discharge
- Strong odor
- Pain and sensitivity
Allergy Symptoms
- Redness and inflammation
- Increased wax
- Often affects both ears
Note: Visual checks are not always enough. Veterinarians often confirm the cause using an otoscope and microscopic exam because these conditions can overlap more than most people expect.

The Warning Signs You Should Never Ignore
If your cat shows any of the following, it’s time to act:
- Frequent or aggressive scratching
- Head shaking
- Dark, crumbly debris
- Foul odor
- Red or inflamed skin
- Sensitivity when touched
When multiple signs show up together, the odds of a medical issue increase significantly.
What Are Ear Mites?
Ear mites are tiny parasites that live inside the ear canal. They feed on skin debris and oils, which creates irritation and inflammation.

As they move and reproduce, they leave behind waste that mixes with wax and skin cells. That’s what forms the dark, crumbly debris people often notice.
Although they’re small, their impact is significant. Left untreated, ear mites can:
- Cause intense discomfort
- Damage the ear canal
- Lead to secondary infections
And because they reproduce quickly, the problem escalates faster than most owners expect.
How Cats Get Ear Mites (Even Indoor Cats)
Many people assume ear mites only affect outdoor cats, but ear mites can spread through close contact, which means they can be introduced in ways you might not expect.

Common transmission sources include:
- Other pets in the home
- Boarding or grooming environments
- Contaminated bedding
- Brief outdoor exposure
Even indoor cats can be exposed if another pet brings mites into the home.
Do Ear Mites Go Away On Their Own?
This is one of the most common misconceptions. The short answer is no.
Ear mites don’t just disappear. Their lifecycle continues, and their population grows over time.
Waiting usually leads to:
- Increased irritation
- More scratching
- Higher risk of infection
Without treatment, the problem will not resolve and often becomes harder to manage.
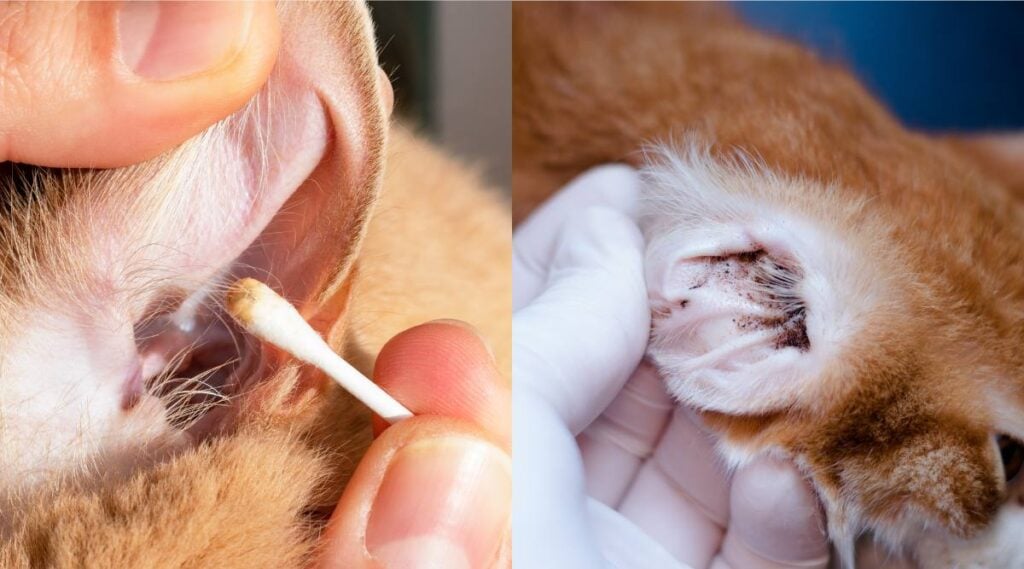
How To Spot Ear Mites
When examining your feline’s ears, check for dark, crumbly brown debris resembling coffee grinds. The debris in the ear is digested material and wax, a result of the parasite infestation.
Other common signs of ear mites include:
- Inflamed skin around the ear
- Hair loss due to excessive scratching
- Buildup of earwax
- Dark discharge or puss
- Angling head
- Flattening or pawing ears
- Foul odor coming from the ear
Your cat’s ears should look clean inside. If you see signs of infection, sores, or ear mites, contact your veterinarian.
How Vets Diagnose Ear Mites
This is where professional care makes a difference. Veterinarians use tools that allow them to see what’s actually happening inside the ear.

Diagnosis typically includes:
- Examining the ear with an otoscope
- Collecting a sample of debris
- Viewing it under a microscope
This confirms whether mites are present or if another condition is causing the symptoms. Accurate diagnosis is what determines the right treatment.
How Ear Mites Are Treated (And How Long It Takes)
Once ear mites are confirmed, treatment is usually straightforward, but it has to be done correctly. Your veterinarian will typically start by cleaning your cat’s ears to remove debris. This helps medication reach the mites more effectively.

From there, treatment may include:
- Topical ear drops
- Oral or topical anti-parasitic medication
- Anti-inflammatory medication if the ear is irritated
Ear mites have a lifecycle of about three weeks. Even if adult mites are killed quickly, eggs can continue to hatch. That’s why completing the full treatment timeline is critical.
During Treatment, Don’t Skip These Steps
While your cat is being treated, a few small steps can make a big difference:
- Keep your cat’s nails trimmed, especially the hind feet, to reduce scratch-related damage to the ear.
- Keep other pets away from the infected cat when possible
- Treat all exposed pets or risk the mites spreading back and forth, restarting the cycle.
- Be consistent. If even a small number of mites survive, the infestation can restart.
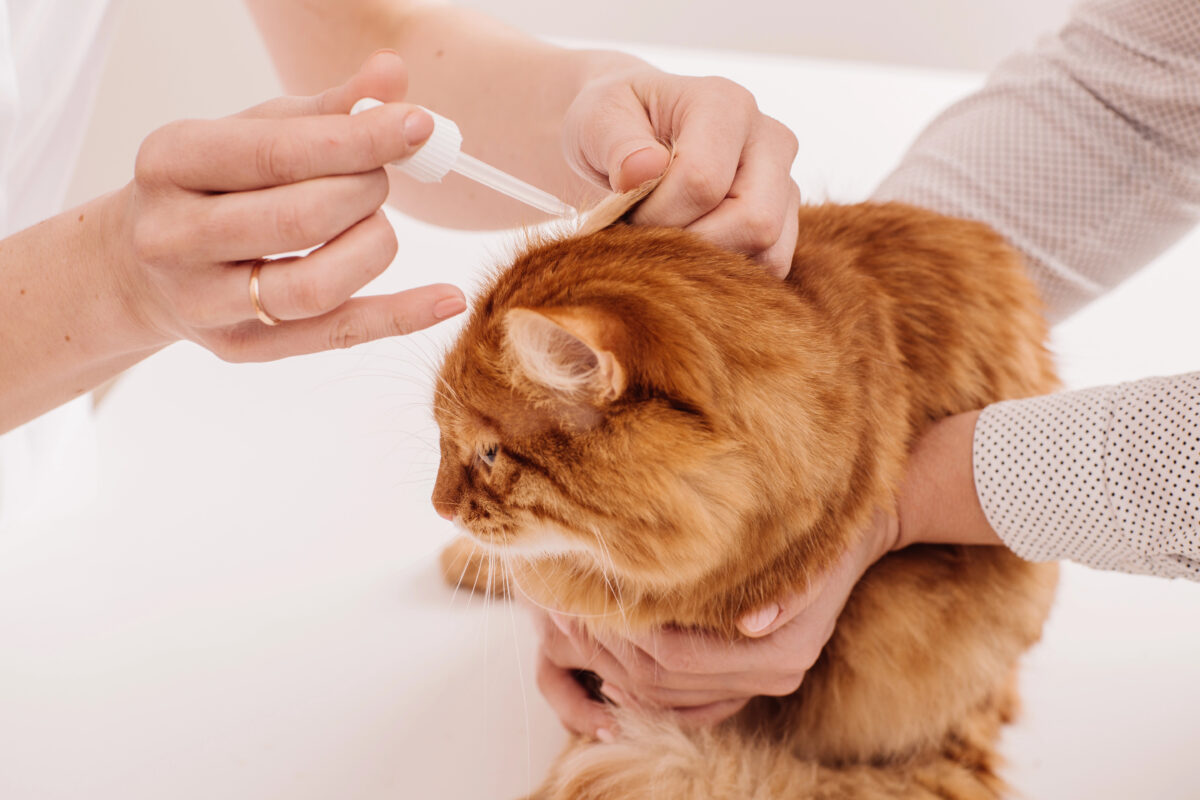
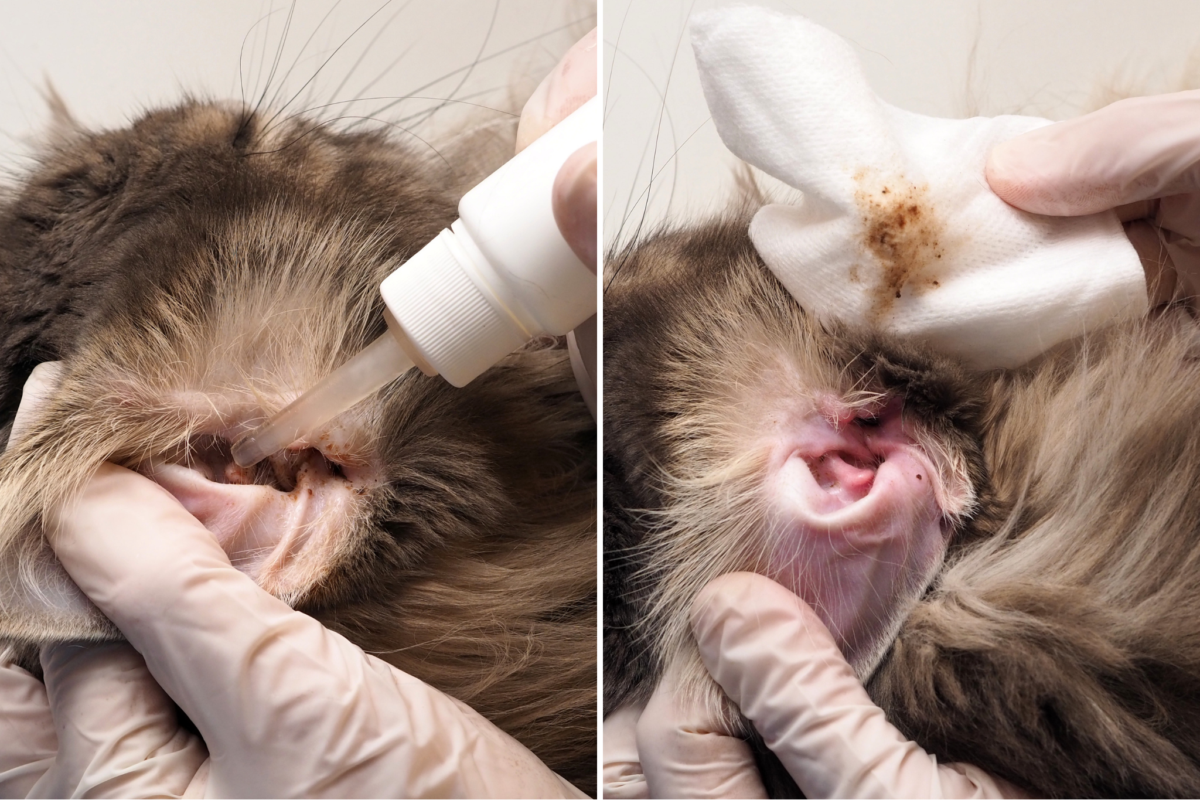
How To Apply Ear Medication Without Stress
Applying ear medication correctly is just as important as the medication itself. A rushed or incomplete application can reduce effectiveness, especially if the medication doesn’t reach deep enough into the ear canal.
Step-By-Step: How To Apply Ear Medication Safely
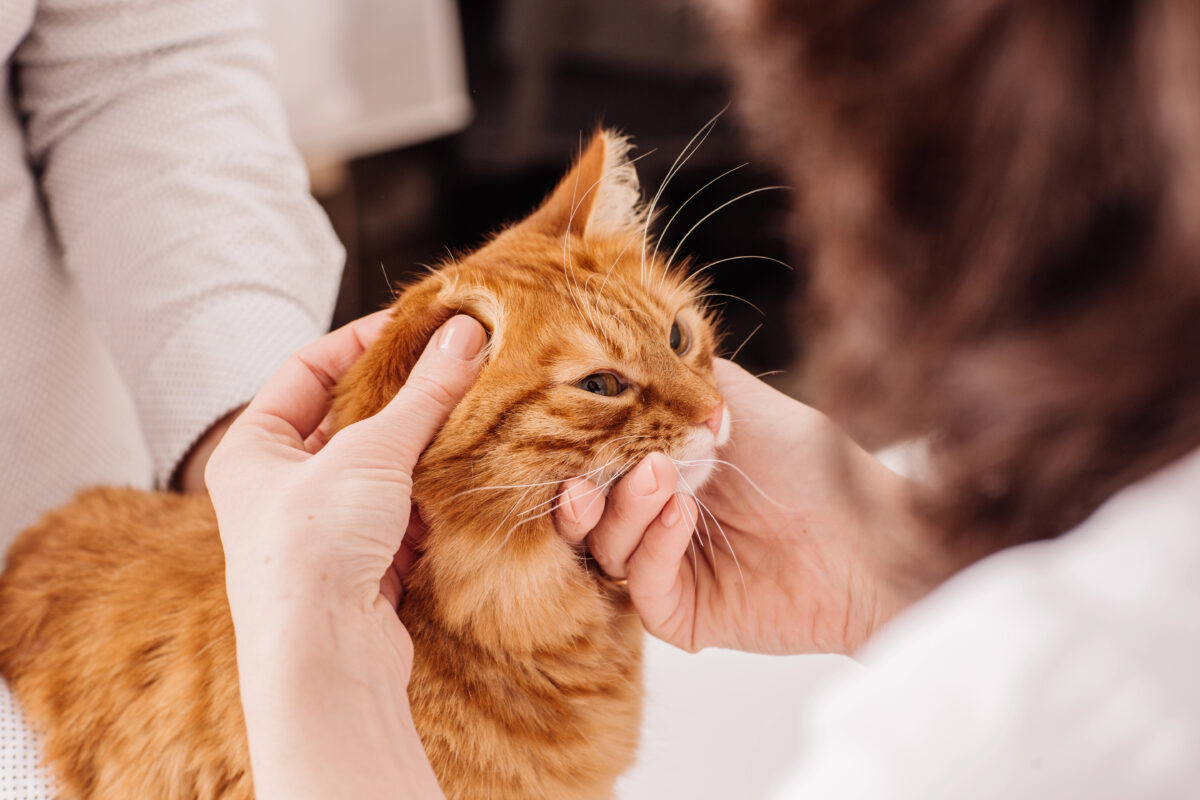
- Prepare everything before you start. Have your medication, cotton or gauze, and treats ready. This keeps the process quick and reduces stress for your cat.
- Position your cat securely. Sit in a comfortable position and gently hold your cat. If needed, wrap them in a towel to prevent sudden movement.
- Gently lift and straighten the ear flap. Hold the ear flap upright to expose and slightly straighten the ear canal. This helps the medication travel downward more easily.
- Administer the prescribed drops. Avoid touching the tip of the bottle to your cat’s ear to prevent contamination.
- Massage the base of the ear for 20–30 seconds. Massaging helps distribute the medication deeper into the ear where mites live.
- Allow your cat to shake their head. This helps loosen debris and spread the medication naturally throughout the ear.
- Wipe away excess debris from the outer ear. Use cotton or gauze to gently clean the visible part of the ear. Do not insert anything deep into the canal.
- Repeat in the other ear if directed. Even if only one ear appears affected, your vet may recommend treating both.
If an ointment or cream is prescribed, place the prescribed medication onto the inside ear flap. Using a gloved hand, spread the medication around the ear.
Household Pet Treatment Checklist
If one pet has ear mites, it’s rarely just one pet for long. Ear mites spread easily through close contact, shared bedding, and grooming habits. Even if your other pets aren’t showing symptoms yet, they may still be carrying mites.
This is where many treatments fail. Owners treat the visibly affected cat, but skip everything else. A few days or weeks later, the scratching comes back.
If One Pet Has Ear Mites, Do This Immediately
- Treat all pets in the household
- Follow your vet’s full treatment plan for each animal
- Wash bedding, blankets, and soft surfaces in hot water
- Vacuum carpets, rugs, and upholstered furniture
- Clean favorite sleeping spots and hideouts
- Avoid sharing grooming tools between pets
- Wash or replace brushes, combs, and ear cleaning supplies
- Monitor all pets for early signs like scratching or head shaking
Why This Step Matters More Than Most People Think
Ear mites don’t stay contained. They move between animals quickly, especially in multi-pet homes. Even brief contact can be enough to spread them.
What makes this tricky is that not all pets show symptoms right away. One pet may be visibly uncomfortable, while another appears completely fine but is still carrying mites. That’s how reinfection happens.
Do You Need To Disinfect Your Entire Home?
Not completely, but targeted cleaning makes a difference. Focus on:
- Areas where your pets sleep
- Shared lounging spaces
- Soft materials that can trap debris
You don’t need to deep-clean every surface, but reducing environmental exposure helps support treatment.
What About Separating Pets?
Temporarily limiting contact can help reduce the spread of ear mites; however, separation alone is not enough. Treatment is still required for all exposed animals to fully break the cycle.
How To Clean Dirty Cat Ears
Cleaning your cat’s ears can help remove mild wax buildup, but only when it’s done correctly.
If your cat’s ears are healthy and only slightly dirty, cleaning can help prevent buildup from worsening. But if the ear is inflamed, painful, or has dark discharge, cleaning can make things worse.
When in doubt, check with your veterinarian before starting.
What You’ll Need Before You Start
You don’t need much, but using the right tools matters. Use a vet-approved ear-cleaning solution with cotton balls or gauze. Avoid products with alcohol or hydrogen peroxide, as these can irritate the ear canal.
If your cat tends to resist handling, having a towel nearby can help keep them secure. Treats are also useful for creating a positive experience.
Step-By-Step: How To Clean Your Cat’s Ears Safely
- Choose a calm, comfortable space. Sit in a quiet area where your cat feels relaxed. This reduces stress and makes the process easier for both of you.
- Hold your cat securely. Gently hold your cat in your lap or on a stable surface. If needed, wrap them in a towel to limit movement.
- Lift and straighten the ear flap. Gently pull back the ear flap to expose the ear canal so the solution can reach the right area.
- Apply the ear cleaning solution. Squeeze the solution into the ear canal as directed. Avoid touching the tip of the bottle to your cat’s ear.
- Massage the base of the ear for 20–30 seconds. This helps break up debris and allows the solution to move through the ear effectively.
- Let your cat shake their head. This helps loosen debris and move it toward the outer ear.
- Wipe away visible debris. Use cotton or gauze to gently clean the inner ear flap and outer ear. Only clean what you can see.
- Reward your cat immediately. Give treats or praise so your cat associates ear cleaning with something positive.
What You Should Never Do
Never use cotton swabs inside the ear canal, as they can push debris deeper and cause injury. Avoid hydrogen peroxide, alcohol, or vinegar, since these can irritate sensitive tissue.
It’s also important not to clean ears that are painful, swollen, or producing dark discharge. In those cases, cleaning can make the problem worse rather than help.
When Cleaning Helps vs When It Doesn’t
Cleaning works best when the issue is simple wax buildup, and your cat isn’t showing signs of discomfort. In those cases, removing debris can help keep the ear healthy.
But if your cat is scratching frequently, shaking their head, or producing dark, crumbly debris, cleaning won’t solve the problem. That’s usually a sign of something medical, like ear mites or an infection.
How Often Should You Clean Your Cat’s Ears?
There’s no set schedule that works for every cat. Some cats rarely need ear cleaning, while others may need occasional maintenance depending on their environment and how much wax they produce.
Instead of cleaning on a routine schedule, focus on checking your cat’s ears regularly and cleaning only when there is visible buildup. Over-cleaning can irritate the ears and make them more sensitive over time.
When Not To Clean Your Cat’s Ears
Cleaning isn’t always helpful. In some cases, it can make the problem worse.
If your cat’s ears are irritated or infected, cleaning can push debris deeper into the ear canal, worsening inflammation. This is where many owners unintentionally delay proper treatment.
Skip Cleaning If You Notice
- Pain or sensitivity when touching the ear
- Strong or unusual odor
- Thick, dark, or excessive discharge
- Frequent scratching or head shaking
These signs usually point to something more than simple wax buildup.
Why Cleaning Can Backfire
When the ear is already inflamed, adding liquid or friction can further irritate the tissue.
Instead of helping, it can:
- Increase discomfort
- Spread debris deeper into the canal
- Make it harder for your vet to assess the ear properly
In these situations, the issue needs treatment, not cleaning.
The Better Move
If you’re unsure whether it’s safe to clean your cat’s ears, pause and observe.
Look at behavior, not just appearance. If your cat seems uncomfortable or the debris looks unusual, it’s best to involve your veterinarian before doing anything else.
Do Some Cats Need Their Ears Cleaned More Often?
Yes, and it often comes down to how your cat’s coat and skin function.

Cats that lack a traditional coat tend to develop more visible ear buildup over time. Their skin produces more oil to compensate for the lack of fur, and without hair in or around the ear, there’s less natural protection against dust and debris.
That combination can lead to faster buildup, even when the ears are otherwise healthy.
Breeds That Tend To Have More Ear Buildup
Some breeds are more prone to this pattern due to their coat type and skin characteristics:
- Sphynx
- Devon Rex
- Cornish Rex
These cats often have little to no fur, or very fine coats that don’t absorb oils the same way as a typical cat’s coat.
What’s Normal For These Cats
For these breeds, some visible ear debris is expected. You may notice that the buildup appears more quickly between cleanings, or that the wax looks darker than what you’d see in other cats.
This doesn’t automatically mean there’s a problem. It simply reflects how their skin and ears function.
Where Owners Get Confused
Because buildup happens more often in these cats, it can be harder to tell what’s normal and what isn’t. The key is to watch for changes.
If the amount increases suddenly, develops a strong odor, or is paired with behaviors like scratching or head shaking, that’s when it’s time to look closer or involve your veterinarian.
How To Prevent Future Ear Problems
You can’t prevent every ear issue, but you can catch most of them early and reduce the chances of them getting worse.
Prevention isn’t about constant cleaning. It’s about paying attention to small changes before they turn into bigger problems.
The Habit That Matters Most
Regular ear checks make the biggest difference. You don’t need to do anything complicated. Just take a quick look at your cat’s ears during normal routines like petting or grooming.
If something looks different than usual, that’s your signal to take a closer look.
Simple Ways To Reduce Risk
- Check your cat’s ears regularly for changes in color, buildup, or smell
- Keep bedding and favorite sleeping areas clean
- Avoid sharing grooming tools between pets
- Follow your vet’s recommendations for routine care
- Stay consistent with parasite prevention if recommended
These small habits help reduce exposure and make it easier to spot problems early.
Keep It Simple With Cleaning
Cleaning should be occasional for most cats. Over-cleaning can irritate the ear and lead to more sensitivity over time. Instead, clean only when there’s visible buildup and the ear looks otherwise healthy.

If your cat tends to develop buildup more frequently, focus on consistency and gentle technique rather than increasing frequency too much.
Watch Behavior, Not Just Appearance
Some of the earliest signs of ear problems aren’t visible. Subtle behavior changes can show up first, like:
- Increased scratching
- Head shaking
- Sensitivity when touched
Catching these early can prevent more serious issues from developing.
Frequently Asked Questions
If you still have questions, you’re not alone. These are some of the most common concerns cat owners have when dealing with dirty ears or ear mites.
Don’t see your question? Respond in the comments, and we’ll get back to you.
Can Ear Mites Go Away On Their Own?
No. Ear mites do not resolve without treatment. They continue to reproduce in the ear canal, increasing irritation and discomfort over time.
Without proper treatment, the infestation can worsen and lead to secondary infections.
Do Indoor Cats Get Ear Mites?
Yes, indoor cats can still get ear mites. Mites spread through contact with other animals or contaminated environments. Even brief exposure, such as contact with another pet or a visit to a grooming or boarding facility, can introduce them into your home.
Can Ear Mites Spread To Other Pets Or Humans?
Ear mites spread easily between pets. Cats, dogs, and other animals can pass mites through close contact, shared bedding, or grooming tools. That’s why veterinarians often recommend treating all pets in the household, even if only one shows symptoms.
In humans, ear mites are not considered a common concern. In rare cases, they may cause mild, temporary irritation, but they do not typically live or reproduce on people.
What Kills Ear Mites In Cats?
Veterinary-prescribed medications are the most effective way to eliminate ear mites. These may include topical ear treatments or systemic medications that target parasites.
Should I Clean My Cat’s Ears Regularly?
Not always. Some cats rarely need ear cleaning, while others may need occasional maintenance.
The best approach is to check your cat’s ears regularly and clean only when there is visible buildup and no signs of irritation. Over-cleaning can lead to sensitivity and increased wax production.
What Does Normal Cat Ear Wax Look Like?
Normal ear wax is usually light brown, smooth, and present in small amounts. It should not have a strong odor or be paired with discomfort.
Dark, crumbly debris or excessive buildup is more likely to signal a problem.
Want To Stay Ahead Of Common Cat Health Issues?
If you made it this far, you’re already doing something most cat owners don’t: paying attention before a small issue turns into a bigger one.
Ear problems are just one piece of the puzzle. Regular grooming, hygiene, and early detection all work together to keep your cat comfortable and healthy.
Here are a few guides to help you stay ahead:
- A guide to common cat symptoms and what they might mean
- How often to change cat litter (and why it matters more than you think)
- Dental treats that actually support your cat’s health
The more you understand what’s normal for your cat, the easier it is to catch problems early and avoid unnecessary discomfort.